Hello everybody,
Is the squared in orange symbols for a capacitor, where can I find them in the circuit, and how to change a misbehaving one?
When tested with multimeter, the wire behaves as having a capacitor but I can't see it nowhere. Is there any chance the capacitor to be part of the endpoint (the plug/connector).
I'm testing the pink/green cable because my speedometer stopped working. There is voltage between the green/black and white/black cables but when I test the purple/green one (multimeter set on measuring ohms) the capacitors charges and when I swap the terminals it has to discharge and start charging again (if I'm not mistaken) but it doesn't charge or discharge, which should mean the problem should be in the capacitor but I can't see capacitor nowhere along the way of the cable.
Is this a capacitor and how to change it
Moderator: Modsquad
-
deyan890
- New Member

- Posts: 6
- Joined: Mon Jun 25, 2018 2:15 am
- Year: 2014
- Color: Grey
- Location: UK/England
Is this a capacitor and how to change it
- Attachments
-
- resize-16118194952043380264resize1611819249380365189IMG20210128071224.jpg (142.74 KiB) Viewed 2998 times

Re: Is this a capacitor and how to change it
Hi and welcome, have the time to fill in your location, this will help us a lot because of possible differences in different countries of the same scooter type.
Back to your question:
Nope, no capacitor.
What's in the orange box you drawn are feed-through contacts from the wire harness connectors.
They do look like capacitors in the way they are drawn. I don't think that in a electronic ignition system there are any capacitors they were only used in ignition systems with breaker points.
Are you using an analog or digital multi meter? best to use a digital one.
May be disconnecting connectors in the part you want to test would be better, some components may act like a capacitor.
-
Mel46

- Forum Benefactor

- Posts: 6959
- Joined: Tue Nov 13, 2012 5:13 pm
- Year: 2013
- Color: red PCX
- Location: Dallas, Ga USA
Re: Is this a capacitor and how to change it
With a little work you can locate exactly where that feed through connector is. Most of the wiring is in plug in sections, for easy replacement by Honda mechanics. When I bought my PCX a mouse or two had made a home in my bike while it was in the shipping crate. The mechanics unplugged the chewed up part of the harness and quickly replaced it with a new harness section. In the old days they would have had to repair what they had, and I think Honda learned from that, thank goodness.
Currently own:
Red 2013 Honda PCX150
Givi tall windshield & tailbox - Lots of extra lights
Custom seat from Thailand - Bad Boy Airhorn
Takegawa Lowering Shocks - Michelin City Grip Tires
Headlight assy upgraded to LEDs w/HS5 main bulbs
NCY variator, drive face, and rollers
Red 2013 Honda PCX150
Givi tall windshield & tailbox - Lots of extra lights
Custom seat from Thailand - Bad Boy Airhorn
Takegawa Lowering Shocks - Michelin City Grip Tires
Headlight assy upgraded to LEDs w/HS5 main bulbs
NCY variator, drive face, and rollers
-
you you

- What's a wot?

- Posts: 10000
- Joined: Sat Jun 30, 2012 5:37 pm
- Location: Between Lulu and Chichi
Re: Is this a capacitor and how to change it
So your speedo isn't working and you have found a wiring connector that you think is capacitors?
I'm subscribing.
I'm subscribing.
-
deyan890
- New Member
- Posts: 6
- Joined: Mon Jun 25, 2018 2:15 am
- Year: 2014
- Color: Grey
- Location: UK/England
Re: Is this a capacitor and how to change it
I'm using digital multimeterOld Scoot wrote: Are you using an analog or digital multi meter?
As this cable connects the display with the speed sensor I traced it all the way and checked the resistance from the display plug (unplugged)Old Scoot wrote:May be disconnecting connectors in the part you want to test would be better, some components may act like a capacitor.
to the connector, and the multimeter showed normal values, also checked with continuity option and the multimeter showed that there is continuity.
Then I checked the resistance in the second half (form the connector to speed sensor, again unplugged) and the conductor behaved as there is capacitor on the way.
The multimeter started charging up to certain limit (less than a minute) and then showed infinity.
I watched few tutorials how to test capacitor thinking there is capacitor somewhere along the way and this should be the correct behaviour for capacitor.
When I checked the second half for continuity it showed that there is no continuity.
So if there is no capacitor I can try to change the cable or trace it to find some damage?
I'll measure the values of few other cables in this bundle and if they behave like normal conductors then this cable shouldn't act as having capacitor along the way,
which will prove there is some issue with the cable itself.
Which component from the picture is the one I'll need to replace
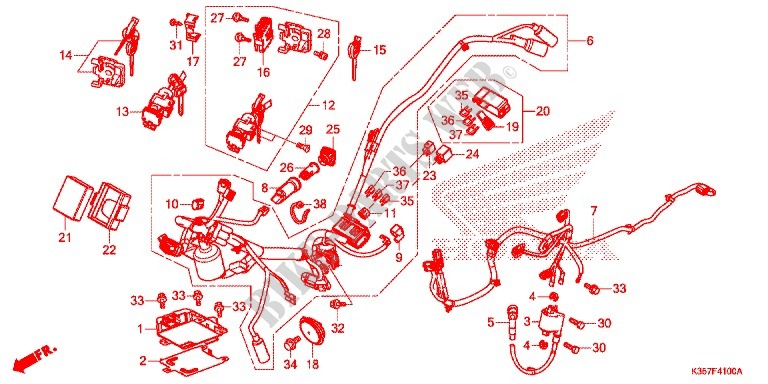
looks like #7 ?
Thank you for the help and clarification.
-
you you
- What's a wot?
- Posts: 10000
- Joined: Sat Jun 30, 2012 5:37 pm
- Location: Between Lulu and Chichi
Re: Is this a capacitor and how to change it
Have you tried cleaning the sensor, if possible, and any connectors between it and the speedo?
-
Mel46
- Forum Benefactor
- Posts: 6959
- Joined: Tue Nov 13, 2012 5:13 pm
- Year: 2013
- Color: red PCX
- Location: Dallas, Ga USA
Re: Is this a capacitor and how to change it
When you are working on electrical problems the first thing to do is to isolate the problem by unplugging any connections associated with that wire bundle. Quite a few times the problem has been water in one of the connectors. This is a common problem in wet climates. WD-40 was made just for that problem.
You will notice on the bundle you are interested in that it connects to multiple items, including the ECM and VS Sensor. Make sure your wire is not picking up stray signals from these by unplugging them. If the bad readings on your meter go away after unplugging these, it is a sure sign that one of your plugs has a problem. On the same hand, if there is NOTHING plugged into that wiring harness that you are checking and you still get a bad reading,, spray out those connector ends.. Check for moisture and spray each connector before reassembly.
You will notice on the bundle you are interested in that it connects to multiple items, including the ECM and VS Sensor. Make sure your wire is not picking up stray signals from these by unplugging them. If the bad readings on your meter go away after unplugging these, it is a sure sign that one of your plugs has a problem. On the same hand, if there is NOTHING plugged into that wiring harness that you are checking and you still get a bad reading,, spray out those connector ends.. Check for moisture and spray each connector before reassembly.
Currently own:
Red 2013 Honda PCX150
Givi tall windshield & tailbox - Lots of extra lights
Custom seat from Thailand - Bad Boy Airhorn
Takegawa Lowering Shocks - Michelin City Grip Tires
Headlight assy upgraded to LEDs w/HS5 main bulbs
NCY variator, drive face, and rollers
Red 2013 Honda PCX150
Givi tall windshield & tailbox - Lots of extra lights
Custom seat from Thailand - Bad Boy Airhorn
Takegawa Lowering Shocks - Michelin City Grip Tires
Headlight assy upgraded to LEDs w/HS5 main bulbs
NCY variator, drive face, and rollers
-
deyan890
- New Member
- Posts: 6
- Joined: Mon Jun 25, 2018 2:15 am
- Year: 2014
- Color: Grey
- Location: UK/England
Re: Is this a capacitor and how to change it
Thank you all for the help!
Before disconnecting the whole wiring loom I noticed that other wires also give weird reading when measuring for resistance.
After disconnecting ALL connectors only the one connecting the display and the speed sensor kept giving constantly increasing values.
I cut the wire on half and measured again to find which half will show values out of bounds.
From the main plug of the bundle to the first half was all good (checked Ohms and continuity) and other half kept showing values as there is capacitor and no continuity.
I started exposing the wires and as closer I was going to the sensor more muddy and sandy it was getting.
In the end of the story the wire was corroded and broken. May be as the two parts of the broken wire were still too close
to each other caused the "capacitor" behaviour and some electricity was "jumping" across ???
After soldering together both parts of the wire, the speedometer started working.
YAY !!!
!!!
Thank you all again for the help and advices!
Before disconnecting the whole wiring loom I noticed that other wires also give weird reading when measuring for resistance.
After disconnecting ALL connectors only the one connecting the display and the speed sensor kept giving constantly increasing values.
I cut the wire on half and measured again to find which half will show values out of bounds.
From the main plug of the bundle to the first half was all good (checked Ohms and continuity) and other half kept showing values as there is capacitor and no continuity.
I started exposing the wires and as closer I was going to the sensor more muddy and sandy it was getting.
In the end of the story the wire was corroded and broken. May be as the two parts of the broken wire were still too close
to each other caused the "capacitor" behaviour and some electricity was "jumping" across ???
After soldering together both parts of the wire, the speedometer started working.
YAY
Thank you all again for the help and advices!
-
Mel46
- Forum Benefactor
- Posts: 6959
- Joined: Tue Nov 13, 2012 5:13 pm
- Year: 2013
- Color: red PCX
- Location: Dallas, Ga USA
Re: Is this a capacitor and how to change it
I am glad that you found the problem. Electrical problems can be difficult to troubleshoot.
I have had more than my share of them, and the best way I have found to isolate them is to disconnect related connectors to see if you can isolate the problem.
I have had more than my share of them, and the best way I have found to isolate them is to disconnect related connectors to see if you can isolate the problem.
Currently own:
Red 2013 Honda PCX150
Givi tall windshield & tailbox - Lots of extra lights
Custom seat from Thailand - Bad Boy Airhorn
Takegawa Lowering Shocks - Michelin City Grip Tires
Headlight assy upgraded to LEDs w/HS5 main bulbs
NCY variator, drive face, and rollers
Red 2013 Honda PCX150
Givi tall windshield & tailbox - Lots of extra lights
Custom seat from Thailand - Bad Boy Airhorn
Takegawa Lowering Shocks - Michelin City Grip Tires
Headlight assy upgraded to LEDs w/HS5 main bulbs
NCY variator, drive face, and rollers
-
you you
- What's a wot?
- Posts: 10000
- Joined: Sat Jun 30, 2012 5:37 pm
- Location: Between Lulu and Chichi
Re: Is this a capacitor and how to change it
Resultdeyan890 wrote:Thank you all for the help!
Before disconnecting the whole wiring loom I noticed that other wires also give weird reading when measuring for resistance.
After disconnecting ALL connectors only the one connecting the display and the speed sensor kept giving constantly increasing values.
I cut the wire on half and measured again to find which half will show values out of bounds.
From the main plug of the bundle to the first half was all good (checked Ohms and continuity) and other half kept showing values as there is capacitor and no continuity.
I started exposing the wires and as closer I was going to the sensor more muddy and sandy it was getting.
In the end of the story the wire was corroded and broken. May be as the two parts of the broken wire were still too close
to each other caused the "capacitor" behaviour and some electricity was "jumping" across ???
After soldering together both parts of the wire, the speedometer started working.
YAY
Thank you all again for the help and advices!
-
deyan890
- New Member
- Posts: 6
- Joined: Mon Jun 25, 2018 2:15 am
- Year: 2014
- Color: Grey
- Location: UK/England
Re: Is this a capacitor and how to change it
I received I PM but it looks like I can't write such "We are sorry, but you are not authorised to use this feature. You may have just registered here and may need to participate more in discussions to be able to use this feature.", so I'll reply here.
The question is : "Where abouts was the issue and did you have to remove panels?"
If I knew exactly where was the problem I could have done the job with only removing the two bolts holding the air filter box to the bike frame
and the plastic wire cover (covering the bundle wires going to the sensor) underneath it, as the wire was broken in spot under the air box.
As I didn't know where was the problem I had to remove the sit, rear panels (around the sit) and right hand side front panel and floorboard
(basically the whole right hand side covers). I also removed the windshield and the front instrumental panel (the plastic under the windshield).
This exposed access to the whole length of the wire going from the display to the sensor.
Sorry for the late reply.