How-To: Remove the Engine from a Honda PCX
Posted: Fri Aug 01, 2014 11:49 am
This how-to covers engine removal. I split this into a separate how-to in case someone kills their engine and needs to give their bike a transplant from a wrecked bike. This is a relatively simple job, but takes a lot of time. It's long enough of a process and involves heavy enough lifting that it's best to do with a friend or two whilst consuming a good portion of beer. Freedog (my best buddy who I ride with all the time) was essential to getting the process done, and essential to helping consume the beer. 
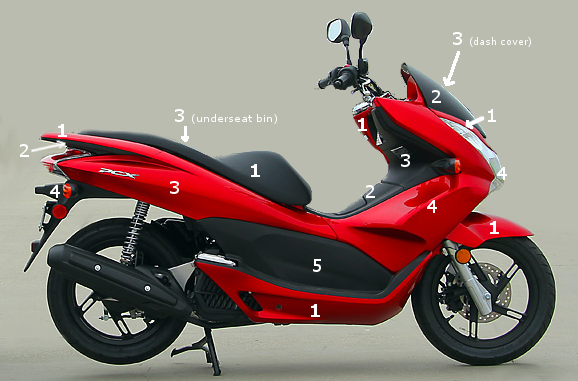
You can attempt to do the procedure by removing the rear end, seat and seat pan, and lower fairings. But, accessing the ECU to unplug it will be difficult, and the bolts that hold the engine in place will be hidden behind panel number 5 in this photo:
For simplicity and sanity, I strongly encourage you to just take the bike completely apart, including removing the battery.
This how-to covers complete disassembly of the PCX: http://hondapcx.org/viewtopic.php?f=3&t=2630
During the process, I didn't need any specialty tools. The tools that I used:
- Metric ratchet set, with a good range of sockets (the engine support mount is a fairly hefty nut)
- Metric wrench (basic crescent wrenches. I used a stubby one in a few areas, the stubby ones fit better in most areas)
- Screwdrivers
- Strap to hang bike from ceiling (optional but useful)
- Floor jack (optional but useful)
Here's my PCX, completely naked:
Some close-ups on the engine area, for reference (in case they're needed for reassembly):
The process begins by removing the engine from the bike. To do this, we start by disconnecting everything that runs from the engine assembly (basically everything that bounces with the suspension).
The injector sits at the front of the engine, and has a tube from the fuel tank running to it. Push the clip in, pry up, then pull off.
Disconnect the fuel line at the bottom:
Disconnect the throttle cable, on top of the engine. You'll have to unbolt it from the retention clip, then rotate the cable out of the circular armature on the throttle body.
Remove the main wiring harness from the FI system:
Unplug the speedometer sensor cable (behind the airbox):
Unbolt the ground wire in front of the airbox (I'm pointing to it):
Unplug the injector:
Unplug the plug near the water pump for the thermostat. The wire here is REALLY tight, so be careful. The water pump is on the right side of the bike, and this picture was taken from the ground looking upwards.
Unplug the harness from the ECU. This is all the way up at the front of the bike, between the gas tank and the front wheel. You'll have to unclip this wire from its retainer clips that go back to the engine too.
Unplug the ignition coil and the plug on the top of it (this is on the left hand side of the bike, note there are 3 connections being unplugged in this pic):
At this point, you should have this nice wire spaghetti of a harness detached from the engine itself:
Unbolt the rear brake, and undo the bolt holding the cable on up at the front of the drive cover:
Remove the radiator fill plug that goes to the coolant tank in the back. I clamped it down with a vice grip and just pulled it off, but forgot to do so at this point in the process and didn't get pictures of it.
Next, remove the exhaust. You have to remove the exhaust to remove the suspension on the right side, unfortunately.
If you have a centerstand, put the bike on its centerstand. My steed doesn't have a centerstand (removed due to grinding in turns and the defective crankcase issue with the 2011s), so I propped mine up on a box:
Start removing the exhaust. There's two bolts holding it on at the bottom, you can see one in the below pic (big silver with round head):
And remove the 3 nuts holding the exhaust itself to the right swingarm, then pull the exhaust off:
Remove your suspension next. You may want to hang the rear of your bike from the ceiling at this point, or just be ready for the rear end to flop down when released. There's a bolt on the left and a bolt on the right.
Right side:
Left side:
Swingarm dropped, bike hanging from ceiling. I have an aftermarket undertray, I just left it on. Your bike will have the mudflap already removed from earlier disassembly:
At this point, the PCX is ready for the engine to come out. All that's holding it in place are the two main mounting bolts. Put your floorjack under the engine (on a flat part, don't mess up anything) and get it supporting a bit of weight. If you don't have a jack, that's fine, you can just chock it underneath.
The engine mounting bolts are between the passenger footpeg supports; one on each side. Loosen both, then remove both while keeping engine and frame supported.
Here's where having two people makes a HUGE difference. I lifted the frame of the bike, and Freedog dropped the jack and brought the engine back and clear of the frame.
The engine assembly, completely removed:
At this point, you're good to reinstall, or even better, install a big bore kit. I'll have a how-to on that soon.
If you found this how-to useful or if it saved you time or money, you should donate to help keep the site running using the orange "Donate" button at the bottom middle of the page. I host hondapcx.org out of pocket, completely ad-free, and do all these tutorials for free to help the community.
You can attempt to do the procedure by removing the rear end, seat and seat pan, and lower fairings. But, accessing the ECU to unplug it will be difficult, and the bolts that hold the engine in place will be hidden behind panel number 5 in this photo:
For simplicity and sanity, I strongly encourage you to just take the bike completely apart, including removing the battery.
This how-to covers complete disassembly of the PCX: http://hondapcx.org/viewtopic.php?f=3&t=2630
During the process, I didn't need any specialty tools. The tools that I used:
- Metric ratchet set, with a good range of sockets (the engine support mount is a fairly hefty nut)
- Metric wrench (basic crescent wrenches. I used a stubby one in a few areas, the stubby ones fit better in most areas)
- Screwdrivers
- Strap to hang bike from ceiling (optional but useful)
- Floor jack (optional but useful)
Here's my PCX, completely naked:
- IMG_7590.JPG (441.88 KiB) Viewed 9873 times
- IMG_7591.JPG (385.74 KiB) Viewed 9873 times
Some close-ups on the engine area, for reference (in case they're needed for reassembly):
- IMG_7592.JPG (312.06 KiB) Viewed 9873 times
- IMG_7593.JPG (359.69 KiB) Viewed 9873 times
- IMG_7594.JPG (387.63 KiB) Viewed 9873 times
- IMG_7595.JPG (315.59 KiB) Viewed 9873 times
The process begins by removing the engine from the bike. To do this, we start by disconnecting everything that runs from the engine assembly (basically everything that bounces with the suspension).
The injector sits at the front of the engine, and has a tube from the fuel tank running to it. Push the clip in, pry up, then pull off.
- IMG_7597.JPG (278.83 KiB) Viewed 9873 times
- IMG_7598.JPG (303.47 KiB) Viewed 9873 times
Disconnect the fuel line at the bottom:
- IMG_7600.JPG (285.97 KiB) Viewed 9873 times
- IMG_7601.JPG (266.71 KiB) Viewed 9873 times
Disconnect the throttle cable, on top of the engine. You'll have to unbolt it from the retention clip, then rotate the cable out of the circular armature on the throttle body.
- IMG_7605.JPG (273.35 KiB) Viewed 9873 times
- IMG_7606.JPG (285.57 KiB) Viewed 9873 times
- IMG_7607.JPG (310.07 KiB) Viewed 9873 times
Remove the main wiring harness from the FI system:
- IMG_7608.JPG (365.09 KiB) Viewed 9873 times
Unplug the speedometer sensor cable (behind the airbox):
- IMG_7610.JPG (302.46 KiB) Viewed 9873 times
Unbolt the ground wire in front of the airbox (I'm pointing to it):
- IMG_7611.JPG (306.86 KiB) Viewed 9873 times
Unplug the injector:
- IMG_7612.JPG (324.64 KiB) Viewed 9873 times
Unplug the plug near the water pump for the thermostat. The wire here is REALLY tight, so be careful. The water pump is on the right side of the bike, and this picture was taken from the ground looking upwards.
- IMG_7613.JPG (235.35 KiB) Viewed 9873 times
- IMG_7617.JPG (238.06 KiB) Viewed 9873 times
Unplug the harness from the ECU. This is all the way up at the front of the bike, between the gas tank and the front wheel. You'll have to unclip this wire from its retainer clips that go back to the engine too.
- IMG_7614.JPG (297.31 KiB) Viewed 9873 times
Unplug the ignition coil and the plug on the top of it (this is on the left hand side of the bike, note there are 3 connections being unplugged in this pic):
- IMG_7621.JPG (304.71 KiB) Viewed 9873 times
At this point, you should have this nice wire spaghetti of a harness detached from the engine itself:
- IMG_7624.JPG (294.45 KiB) Viewed 9873 times
Unbolt the rear brake, and undo the bolt holding the cable on up at the front of the drive cover:
- IMG_7625.JPG (273.42 KiB) Viewed 9873 times
- IMG_7626.JPG (407.64 KiB) Viewed 9873 times
Remove the radiator fill plug that goes to the coolant tank in the back. I clamped it down with a vice grip and just pulled it off, but forgot to do so at this point in the process and didn't get pictures of it.
Next, remove the exhaust. You have to remove the exhaust to remove the suspension on the right side, unfortunately.
If you have a centerstand, put the bike on its centerstand. My steed doesn't have a centerstand (removed due to grinding in turns and the defective crankcase issue with the 2011s), so I propped mine up on a box:
- IMG_7627.JPG (339.67 KiB) Viewed 9873 times
Start removing the exhaust. There's two bolts holding it on at the bottom, you can see one in the below pic (big silver with round head):
- IMG_7629.JPG (268.88 KiB) Viewed 9873 times
And remove the 3 nuts holding the exhaust itself to the right swingarm, then pull the exhaust off:
- IMG_7630.JPG (232.48 KiB) Viewed 9873 times
Remove your suspension next. You may want to hang the rear of your bike from the ceiling at this point, or just be ready for the rear end to flop down when released. There's a bolt on the left and a bolt on the right.
Right side:
- IMG_7633.JPG (250.01 KiB) Viewed 9873 times
Left side:
- IMG_7634.JPG (282.15 KiB) Viewed 9873 times
Swingarm dropped, bike hanging from ceiling. I have an aftermarket undertray, I just left it on. Your bike will have the mudflap already removed from earlier disassembly:
- IMG_7635.JPG (298.19 KiB) Viewed 9873 times
At this point, the PCX is ready for the engine to come out. All that's holding it in place are the two main mounting bolts. Put your floorjack under the engine (on a flat part, don't mess up anything) and get it supporting a bit of weight. If you don't have a jack, that's fine, you can just chock it underneath.
The engine mounting bolts are between the passenger footpeg supports; one on each side. Loosen both, then remove both while keeping engine and frame supported.
- IMG_7637.JPG (316.13 KiB) Viewed 9873 times
Here's where having two people makes a HUGE difference. I lifted the frame of the bike, and Freedog dropped the jack and brought the engine back and clear of the frame.
- IMG_7644.JPG (359.3 KiB) Viewed 9873 times
The engine assembly, completely removed:
- IMG_7646.JPG (290.69 KiB) Viewed 9873 times
At this point, you're good to reinstall, or even better, install a big bore kit. I'll have a how-to on that soon.
If you found this how-to useful or if it saved you time or money, you should donate to help keep the site running using the orange "Donate" button at the bottom middle of the page. I host hondapcx.org out of pocket, completely ad-free, and do all these tutorials for free to help the community.