How-To: Install a final drive gear up kit
Posted: Tue May 05, 2015 5:43 pm
Kitaco and Yuminashi (maybe others) make gear up kits for the PCX's transmission to change the final drive gearing.
The transmission is a bit of a hassle to get to. It involves removing the exhaust, rear wheel, and the entire drive assembly (variator and clutch). Additionally, the Yuminashi kit involves pressing off a gear and pressing a new gear on, which required (at least for my PCX) a huge industrial press. The Kitaco kit is just replacement of one gear though, which is trivial.
The only downside to either kit is, the speedometer does not account for them. The speedometer reads off the Final Gear (as Honda calls it), which is completely confusing given the clutch shaft outputs to the Drive Shaft, and the entire microfiche provided by Honda is rotated 180 degrees from how you see it on the bike.... It gets confusing, so here's a quick primer on the PCX transmission before I start:
Quick disclaimer: This all is stock on the 2011 PCX. Other PCXes may have *slight* variations in gearing.
5. "Drive Shaft" according to Honda. 17 tooth stock. This interfaces with the clutch, and sticks out the left side of the transmission into the clutch. Interfaces with 7. No aftermarket options exist that I know of.
6. "Countershaft" according to Honda. 13 tooth stock. This is driven by 7 (which it slides into), and outputs to 8.
7. "Counter Gear" according to Honda. 53 tooth stock. This is driven by 5, and outputs to 7 (which slides into it).
8. "Final Gear" according to Honda. 47 tooth stock. This is driven by 6, and outputs to the rear wheel.
About the Kits
Start by removing the rear wheel, as in this how-to: http://hondapcx.org/viewtopic.php?f=3&t=1356
Next, remove the lower left body panel and then the CVT cover, and then the variator as in this how-to: http://hondapcx.org/viewtopic.php?f=3&t=2598
Next, remove the clutch. You can use the tool and a wrench the same as the CVT, but almost all PCXes will require an impact gun to remove the clutch the first time, as a fair warning.
I don't run with a centerstand, so my PCX is sitting on a toolbox for a tile saw. You can just use a centerstand, no need to buy a tile saw for the case. Here's a pic where you should be at this point:
From that pic, it looks like I forgot to say undo the rear brake... Do that too.
Next, remove the speedometer cover. There's an allen wrench at the front and back:
The speedometer sensor is clipped to the cover, so wiggle the back to the right to get it off the grommet on the back right side of the cover, then lift, exposing the speedometer cable. Gently unclip it.
Finally, unclip the little wire retention clip for the speedometer sensor and pull the cover off.
Flop the rear drum brakes off. They just both flop off from the top towards the middle.
Pop off the breather hose. It goes into the airbox and is just tucked up in there.
Drain the oil in the final drive through the drain bolt (the one that is missing in this picture). Remove the other 6 bolts that secure the transmission cover in place. Bolts before removal...
...and after:
The bolt lengths vary, and their location is important, so I have laid them out in the same layout as the holes:
Slide off the transmission cover.
Here's our gears! Notice how it's rotated 180 degrees from the Honda Microfiche... Silly engineers. The Final Gear is on the left, the Counter Gear is in the middle, and the Drive Shaft is on the right. Remember, those are Honda terms, not mine.
The Kitaco kit replaces the center gear. The Yuminashi kit replaces the left gear (you have to use a press to get it off, then back on the shaft) and the gear hidden behind the center gear.
The center (Counter Gear) should pull out by hand.
Here's them side by side. Hell if I remember which is which, I took these pictures months ago. You can count the teeth if you want. They're very similar in appearance. If you are doing the Kitaco kit, drop the new gear in and reassemble and you're done.
The Final Gear and the Countershaft also just comes out by hand.
Old Countershaft on left, new on right.
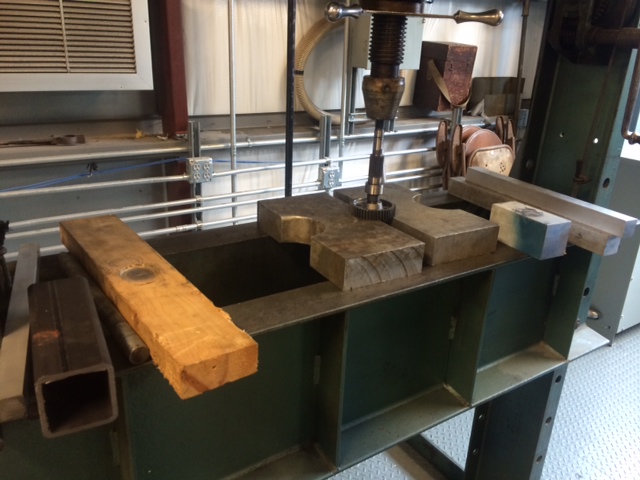
In this pic, I've already had the new (smaller) Final Gear pressed onto the driveshaft. The bigger stock one is on the left, new on right.
Here's the Final Gear getting pressed on. The press is huge! Good thing we have a machine shop at work. You CANNOT remove and put back on the Final Gear for the Yuminashi kit by hand. Even the 12-ton shop press I bought from Harbor Freight couldn't do it. I ended up using the absolutely massive one at work, which is at least a 50-ton press. It's self-explanatory to press a gear on or off if you have a press, so I'll leave that to you.
The Final Gear before going in:
The gearbox, sans-gears:
Adding them in:
And ready for the cover with the new gasket in place:
Reverse the process to put it all back together, add 10w30 as your gear oil (yes, that is what Honda calls for as the specification) and you're done. If you need instructions for filling the final drive oil, see this thread: http://www.hondapcx.org/viewtopic.php?f=3&t=3224
The speedometer sensor can be replaced if you bought one from Yuminashi. The stock one won't read off the smaller gear. It's a quick swap while you have everything apart. Remove the one bolt securing the sensor:
Old sensor on right, new sensor on left. Notice how the new one is longer.
Pull the oring off the old sensor gently. The new sensor does not include an oring, so you can reuse the old one:
Install the new sensor and reassemble. Again, please make sure to fill the transmission with fluid.
I hope you found this how-to helpful. If you have any questions or get stuck along the way, feel free to ask.
The transmission is a bit of a hassle to get to. It involves removing the exhaust, rear wheel, and the entire drive assembly (variator and clutch). Additionally, the Yuminashi kit involves pressing off a gear and pressing a new gear on, which required (at least for my PCX) a huge industrial press. The Kitaco kit is just replacement of one gear though, which is trivial.
The only downside to either kit is, the speedometer does not account for them. The speedometer reads off the Final Gear (as Honda calls it), which is completely confusing given the clutch shaft outputs to the Drive Shaft, and the entire microfiche provided by Honda is rotated 180 degrees from how you see it on the bike.... It gets confusing, so here's a quick primer on the PCX transmission before I start:
- Screen Shot 2015-05-05 at 6.15.03 PM.png (72.85 KiB) Viewed 73470 times
5. "Drive Shaft" according to Honda. 17 tooth stock. This interfaces with the clutch, and sticks out the left side of the transmission into the clutch. Interfaces with 7. No aftermarket options exist that I know of.
6. "Countershaft" according to Honda. 13 tooth stock. This is driven by 7 (which it slides into), and outputs to 8.
7. "Counter Gear" according to Honda. 53 tooth stock. This is driven by 5, and outputs to 7 (which slides into it).
8. "Final Gear" according to Honda. 47 tooth stock. This is driven by 6, and outputs to the rear wheel.
About the Kits
- The Kitaco kit (Kitaco 305-1426010) replaces the Counter Gear, switching from a 53 tooth gear to a 51 tooth. The new gear interfaces with the stock 17 tooth Drive Shaft. The stock ratio is 3.12:1, and the new ratio is 3:1, or a 4% increase in top speed.
- The Yuminashi kit (FORGED GEAR SPROCKET SET 15/45 (3.0)) changes the gearing on the PCX from a 47 tooth Final Gear interfacing with a 13 tooth Countershaft to a 45 tooth Final Gear interfacing with a 15 tooth Countershaft. The stock ratio is 3.62:1, and the new ratio is 3:1, or a 20.67% increase in top speed.
- Gearing is multiplicative, meaning these changes together add 25.5% overall increase in top speed. For a nominal speed of 65mph actual, that means 81.575mph new actual speed, assuming your bike can push down the power to get there.
- This also means that 81.575mph new actual speed will read as 65mph with the stock speedometer. You can fix that with a speedometer healer, which I might buy and make a howto for eventually.
- IMG_7824.JPG (297.25 KiB) Viewed 73470 times
Next, remove the lower left body panel and then the CVT cover, and then the variator as in this how-to: http://hondapcx.org/viewtopic.php?f=3&t=2598
Next, remove the clutch. You can use the tool and a wrench the same as the CVT, but almost all PCXes will require an impact gun to remove the clutch the first time, as a fair warning.
I don't run with a centerstand, so my PCX is sitting on a toolbox for a tile saw. You can just use a centerstand, no need to buy a tile saw for the case.
- IMG_7836.JPG (282.88 KiB) Viewed 73453 times
From that pic, it looks like I forgot to say undo the rear brake... Do that too.
Next, remove the speedometer cover. There's an allen wrench at the front and back:
- IMG_7837.JPG (263.79 KiB) Viewed 73453 times
- IMG_7839.JPG (265.08 KiB) Viewed 73453 times
The speedometer sensor is clipped to the cover, so wiggle the back to the right to get it off the grommet on the back right side of the cover, then lift, exposing the speedometer cable. Gently unclip it.
- IMG_7841.JPG (290.27 KiB) Viewed 73453 times
Finally, unclip the little wire retention clip for the speedometer sensor and pull the cover off.
- IMG_7848.JPG (218.51 KiB) Viewed 73453 times
- IMG_7849.JPG (255.21 KiB) Viewed 73453 times
Flop the rear drum brakes off. They just both flop off from the top towards the middle.
- IMG_7853.JPG (267.94 KiB) Viewed 73453 times
Pop off the breather hose. It goes into the airbox and is just tucked up in there.
- IMG_7857.JPG (233.46 KiB) Viewed 73453 times
Drain the oil in the final drive through the drain bolt (the one that is missing in this picture). Remove the other 6 bolts that secure the transmission cover in place. Bolts before removal...
- IMG_7858.JPG (276.3 KiB) Viewed 73453 times
...and after:
- IMG_7862.JPG (277.62 KiB) Viewed 73453 times
The bolt lengths vary, and their location is important, so I have laid them out in the same layout as the holes:
- IMG_7859.JPG (263.03 KiB) Viewed 73453 times
Slide off the transmission cover.
- IMG_7863.JPG (234.65 KiB) Viewed 73453 times
Here's our gears! Notice how it's rotated 180 degrees from the Honda Microfiche... Silly engineers. The Final Gear is on the left, the Counter Gear is in the middle, and the Drive Shaft is on the right. Remember, those are Honda terms, not mine.
- IMG_7866.JPG (300.29 KiB) Viewed 73453 times
The Kitaco kit replaces the center gear. The Yuminashi kit replaces the left gear (you have to use a press to get it off, then back on the shaft) and the gear hidden behind the center gear.
The center (Counter Gear) should pull out by hand.
- IMG_7867.JPG (283.53 KiB) Viewed 73453 times
Here's them side by side. Hell if I remember which is which, I took these pictures months ago. You can count the teeth if you want. They're very similar in appearance. If you are doing the Kitaco kit, drop the new gear in and reassemble and you're done.
- IMG_7868.JPG (332.43 KiB) Viewed 73453 times
The Final Gear and the Countershaft also just comes out by hand.
- IMG_7870.JPG (282.3 KiB) Viewed 73453 times
Old Countershaft on left, new on right.
- IMG_7871.JPG (274.35 KiB) Viewed 73453 times
In this pic, I've already had the new (smaller) Final Gear pressed onto the driveshaft. The bigger stock one is on the left, new on right.
- IMG_7882.JPG (251.85 KiB) Viewed 73453 times
Here's the Final Gear getting pressed on. The press is huge! Good thing we have a machine shop at work.
The Final Gear before going in:
- IMG_7883.JPG (231.38 KiB) Viewed 73453 times
The gearbox, sans-gears:
- IMG_7888.JPG (275.03 KiB) Viewed 73453 times
Adding them in:
- IMG_7889.JPG (284.6 KiB) Viewed 73453 times
And ready for the cover with the new gasket in place:
- IMG_7892.JPG (266.18 KiB) Viewed 73453 times
Reverse the process to put it all back together, add 10w30 as your gear oil (yes, that is what Honda calls for as the specification) and you're done. If you need instructions for filling the final drive oil, see this thread: http://www.hondapcx.org/viewtopic.php?f=3&t=3224
The speedometer sensor can be replaced if you bought one from Yuminashi. The stock one won't read off the smaller gear. It's a quick swap while you have everything apart. Remove the one bolt securing the sensor:
- IMG_7894.JPG (257.28 KiB) Viewed 73453 times
Old sensor on right, new sensor on left. Notice how the new one is longer.
- IMG_7897.JPG (263.6 KiB) Viewed 73453 times
Pull the oring off the old sensor gently. The new sensor does not include an oring, so you can reuse the old one:
- IMG_7898.JPG (234.82 KiB) Viewed 73453 times
Install the new sensor and reassemble. Again, please make sure to fill the transmission with fluid.
I hope you found this how-to helpful. If you have any questions or get stuck along the way, feel free to ask.